Tuesday 19 December 2017

Visual Pattern Cards

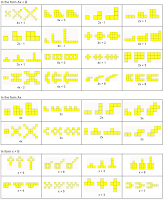
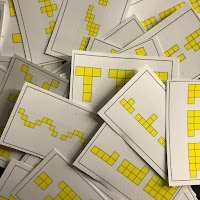
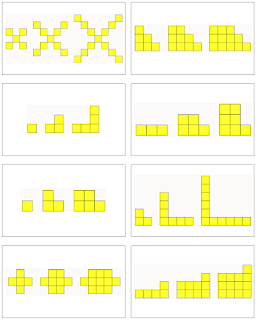
This activity was inspired by @JoBoalar's TED talks were she talks about people using colours to show how patterns grow. It was also inspired by @FawnpNguyen's awesome VisualPatterns.org site. The premiss is simple, students are each given a card with three terms of a linear pattern on it. They are to recreate the pattern (and add two more terms) using colour to show how it grows. Then they use what they see to help come up with a general term for their pattern.

For this activity there are 32 cards made that have linear patterns in the form Ax, x + B and Ax + B. For grade 7, if your focus is developing the general term, then you should just use the cards with general terms in the form Ax & x + B (patterns that have expressions involving only one operation).


  • Gr7PA – represent linear growing patterns, using a variety of tools (e.g., concrete materials, paper and pencil, calculators, spreadsheets) and strategies (e.g., make a table of values using the term number and the term; plot the coordinates on a graph; write a pattern rule using words);
  • Gr7PA – make predictions about linear growing patterns, through investigation with concrete materials;
  • Gr7PA – develop and represent the general term of a linear growing pattern, using algebraic expressions involving one operation (e.g., the general term for the sequence 4, 5, 6, 7, … can be written algebraically as n + 3, where n represents the term number; the general term for the sequence 5, 10, 15, 20, … can be written algebraically as 5n, where n represents the term number); 
  • Gr8PA – represent, through investigation with concrete materials, the general term of a linear pattern, using one or more algebraic expressions (e.g.,“Using toothpicks, I noticed that 1 square needs 4 toothpicks, 2 connected squares need 7 toothpicks, and 3 connected squares need 10 toothpicks. I think that for n connected squares I will need 4 + 3(n – 1) toothpicks, because the number of toothpicks keeps going up by 3 and I started with 4 toothpicks. Or, if I think of starting with 1 toothpick and adding 3 toothpicks at a time, the pattern can be represented as 1 + 3n.”);
  • Gr8PA – represent linear patterns graphically (i.e., make a table of values that shows the term number and the term, and plot the coordinates on a graph), using a variety of tools (e.g., graph paper, calculators, dynamic statistical software);
  • Gr8PA – determine a term, given its term number, in a linear pattern that is represented by a graph or an algebraic equation 
  1. For this activity there are 32 possible cards to use. Print them out on card stock (and laminate them if possible). Cut out each card to create a class set. If you are doing this with grade 7s then you may want two sets of the last two pages of cards since they deal with general terms in the form Ax & x + B.
  2. Print out the Answer card so that you can circulate easily giving help or advice. 
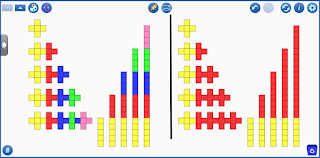
  3. Students should have enough connecting cubes or colour tiles of various colours to create the patterns. Or students could use this virtual colour tiles app from Mathies.ca

  1. Hand out one card per student (you could also do one card per pair and have extra cards for students that finish early)
  2. Instruct students to recreate their pattern using colours (connecting cubes or colour tiles) to show how the pattern grows. You may also ask them to restrict to two colours and show it that way as well. 
  3. Once students have recreated their pattern, have them create the next two terms using the same colour distinctions. 
  4. Once you are satisfied with their five terms, have them re arrange their tiles so that they create a line of each set of tiles for each term (like a bar graph).  While groups are getting to the same place you might ask quicker groups to determine the number of tiles needed for the 15th term
  5. Next have students use their tiles to help determine the general term 
  6. You might want to take several different examples to consolidate creating the general term. 
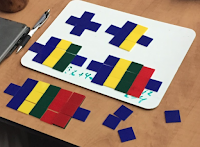
As an alternate procedure you might consider the progression of steps seen in this video using some of these cards to more systematically develop the a method for generating the algebraic expression for a linear pattern. 


Did you use this activity? Do you have a way to make it better? If so tell us in the comment section. Thanks

Thursday 30 November 2017

Rational Functions Continuum

We are continuing to develop a series of "Continuum" activities. In these activities, students are given basic knowledge questions on cards from an envelope. On each card there is one type of question. When the student completes a set number of questions on their card correctly, they then replace that card and grab a new card from the next envelope. This next envelop will typically have problems of a similar (to each other) type but incrementally more difficult than the previous envelope. In this way students move from simpler to more difficult questions at their own pace.

Here we have two sets of cards. On one set we have rational equations that start with simple ratio type questions and move to rational equations with polynomials. The second set are similar in style but are created from rational inequalities. In each case, as students move through the cards, the questions become more difficult.

Note that if you look at the expectations, they both say "simple" equations/inequalities but as you move to the last few cards, you may not consider those simple. That is purposeful. We create the cards so that the first one is easy enough for everyone but the last one(s) may go beyond the curriculum so that kids who are not struggling have some place to go that may be challenging. As a teacher, you should decide which card is the level that you hope all students will reach. For other rational function activities to investigate their nature, check out our other post here.

Typically when we have done these, students could check their answers by using a UV pen to reveal the answers written on the answer cards (see example from our fraction continuum to the right). This adds a bit of "magic" to this activity that the students tend to enjoy making them work just a little harder.
  • MHF4U 3.6 - solve simple rational equations in one variable algebraically, and verify solutions using technology
  • MHF4U 4.2 - determine solutions to polynomial inequalities in one variable [e.g., solve f(x) ≥ 0, where f(x) = x3 – x2 + 3x – 9] and to simple rational inequalities in one variable by graphing the corresponding functions, using graphing technology, and identifying intervals for which x satisfies the inequalities
  • Enough copies of each of the question cards for your class (there are six cards per page at each level except the last) in different colour card stock for each level, laminated (use colours that allow seeing the magic pen writing - you may want to test this). You will likely not need as many cards in the last few envelopes as students work at different paces. 
  • The answer cards are the same as the question cards but you write the answers in invisible ink on them. To help distinguish the answer cards to the question cards you should put a stamp or sticker on the back. Write on the cards first then laminate them. If you write on the card after lamination then the ink tends to wear off. There are sample answers at the end of each document. That is for you to carry around (or not) but not for showing students - more for your reference.
  • The "magic" pens can be purchased at Chapters/Indigo or we found these at a Scholastic's book fair. We have since purchased some on eBay or Amazon.

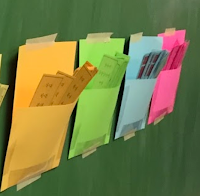
  1. Place the questions in piles (or in envelopes taped to the wall) in order of difficulty and set up three stations for the answer cards. Students will get a card and answer the first 4 questions (you might choose less or more questions to answer but typically choose a number so that if they don't get them all correct, there are enough questions left on the card for them to practice more). 
  2. You could have all students start at level 1 but for this activity to be most successful, students should start at the appropriate envelope. If they start in one that is too hard they will be frustrated and if they start in one that is too easy they will be bored. Use an exit card (the day before) to help you decide which envelope each student should start in. When giving back the exit card write down the colour card they will start in. 
  3. Students may decide to do one question at a time and then go check their answer or they may do all 4 and then check. Students are monitoring themselves so they decide. If they get the first 4 right, they have a level of mastery to move themselves to the next card. If not there are more questions on the card until they master that type. You can decide whether you want them to do the other 2 or just do enough to get a total of four correct. 
  4. As they move through the continuum, the hope is that they reach the level that you decide equates to "simple" but not too hard4. You may wish to have them do all the questions on that card. 
Note that we have been having some issues with Google Docs reformatting the cards depending on what machine or browser you are using. This seems especially true with these cards where there are so many equations. So you may have to reformat when you make your own copy. For a good version, just use the PDFs.
Did you use this activity? Do you have a way to make it better? If so tell us in the comment section. Thanks

Wednesday 27 September 2017

Mixed Radical Card Sort

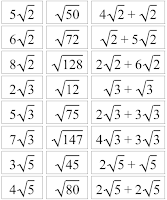
This is supposed to be a quick introduction activity to mixed radicals. Rather than just tell students what mixed radicals are and how they behave, we would start with these and have them explore first and then consolidate afterwards. There are four groups of cards where each group has a different "root" radical. Within each group there are three sets cards that are all equal in value but different in form. Students have to arrange group the cards that are equal and hopefully come up with the connection between a radical in different forms. There is a physical card version as well as a Desmos Cardsort version.
  • MCR3U - verify, through investigation with and without technology, that √ab = √a x √b, a ≥ 0, b ≥ 0, and use this relationship to simplify radicals (e.g., √24) and radical expressions obtained by adding, subtracting, and multiplying 
  • If you are using the physical version, we recommend printing each set of cards (2 pages) on a different colour of cardstock. This makes it easier to group the cards afterwards since each group will be a different colour. We also suggest laminating the cards before cutting. 
  • You may wish to print out one copy of the full two sheets back to back for yourself as an answer key.
  • If you are using the Desmos version, make a copy of the activity and create your class code for students. 
  1. Put students into groups of 3 (or four). Using larger groups will make this activity go faster but will mean that students do less.
  2. Ask students to determine all the expressions that are equal to each other. Because this is an intro activity and students don't know the properties of mixed radicals, let them use calculators. It is optional to tell them that there are a total of 12 sets of three cards that are equal. If you are pressed for time you might take some of the sets out.
  3. Once students have found all of their matches ask them to further group those sets of three in any way they wish. Hopefully they will put them into four groups with the same "root" radical.
  4. As further extensions
  5. You may wish to ask some of the questions, below, from the Desmos cardsort (there are even more there) to pull out the nature of mixed radicals.

Did you use this activity? Do you have a way to make it better? If so tell us in the comment section. Thanks
Friday 30 June 2017

Trig Identities Continuum

We have started to develop a number of "Continuum" activities. In these activities, students are given basic knowledge questions on cards from an envelope. On each card there is one type of question. When the student completes a set number of questions on their card correctly, then they replace that card and grab a new card from the next envelope. This next envelop will typically have problems of a similar (to each other) type but incrementally more difficult than the previous envelope. In this way students move from simpler to more difficult questions at their own pace. The cards start with Quotient and Reciprocal Identities, then move to Pythagorean, then to progressively more difficult mixed identities and finally a card where they make their own.

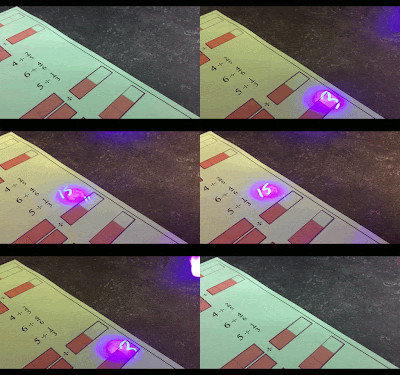
We've created two versions. One where all the equations are identities and one where some of them are not. Typically when we have done these, students could check their answers by using a UV pen to reveal the answers written on the answer cards (see example from our fraction continuum to the right). Because these are identities we chose to have the two sets so if you use set one, students just verify that they are identities. However, if you use set two, students will have to figure out which ones are and which are not identities. So on this second set you could have cards that have the invisible ink that verify which are the identities.


  • MCR3U - 1.5 prove simple trigonometric identities, using the Pythagorean identity sin2(x) + cos2(x) = 1; the quotient identity tan(x) = sin(x)/cos(x); and the reciprocal identities sec(x) = 1/cos(x), csc(x) = 1/sin(x) , and cot(x) = 1/tan(x)
  • MHF4U - As review

  • Enough copies of each of the question cards for your class (there are six cards per page at each level) in different colour card stock for each level, laminated (use colours that allow seeing the magic pen writing - you may want to test this). You will likely not need as many cards in the last few envelopes as students work at different paces. 
  • If you are using the set with the non-identities then you should have 3 sets of the answer cards (use magic pen to write the answers anywhere along each equation - the answers are on the last page of the Google Doc). The answer cards are the same as the question cards but you write the answers in invisible ink on them. To help distinguish the answer cards to the question cards you should put a stamp or sticker on the back. Write on the cards first then laminate them. If you write on the card after lamination then the ink tends to wear off. There are sample solutions at the end of each document. That is for you to carry around (or not) but not for showing students but more for your reference.
  • 3 "magic" pens can be purchased at Chapters/Indigo or we found these at a Scholastic's book fair. We have since purchased some on eBay or Amazon.


  1. Place the questions in piles (or in envelopes taped to the wall) in order of difficulty and set up three stations for the answer cards (if you are using the ones with non-identities). Students will get a card and answer the first 4 questions. 
  2. Normally we might have students start at different places but because of the fact that there are different identities on each card, students should start at the first envelope.  
  3. If they are using the set with non-identities, to check their answers, they will go to a station and use the magic pens. Students may decide to do one question at a time and then go check their answer or they may do all 4 and then check. Students are monitoring themselves so they decide. If they get the first 4 right, they have a level of mastery to move themselves to the next card. If not there are more questions on the card until they master that type. You can decide whether you want them to do the other 4 or just do enough to get a total of four correct. 
  4. As they move through the continuum, the hope is that they reach level 4 which matches the grade 11 curriculum. You may wish to have them do all the questions on that card. 
  5. The fifth level is set up to challenge students who are moving forward quickly. Here they create their own question.

Note that we have been having some issues with Google Docs reformatting the cards depending on what machine or browser you are using. So you may have to reformat when you make your own copy. For a good version, just use the PDFs.
Did you use this activity? Do you have a way to make it better? If so tell us in the comment section. Thanks

Wednesday 26 April 2017

Sort Students into Groups using Percents, Fractions and Decimals


In this activity students are each given one card. The card will either have a fraction, percent or decimal. Their job is to find the two other students who have the same value but a different representation. This shouldn't take too long and could be repeated every couple of days just to solidify conversion between fraction, decimal and percent.

If you wish you can also have students do this individually with this Desmos cardsort.


  • Gr7 - determine, through investigation, the relationships among fractions, decimals, percents, and ratios
  • Gr8 - translate between equivalent forms of a number (i.e., decimals, fractions, percents)
  • MPM1D, MFM1P - As review
  • Download the cards and cut them out (you may want to put them on cardstock and laminate)


  1. Shuffle the cards and distribute one per student. Note that there are 12 sets of 3 cards so you may want to remove sets to more closely match your student population. 
  2. Instruct students to find the two other people that have the same value but a different representation. 
  3. Once students find their partners they will be in groups of three,
  • Group Fractions, Decimals, Percent Cards (Googledoc) (pdf)
  • Individual Desmos Cardsort Version
Did you use this activity? Do you have a way to make it better? If so tell us in the comment section. Thanks

Thursday 20 April 2017

Fraction Operation Continuum

As math teachers we definitely want our students to practice to become proficient but piles of problems or worksheets aren't going to be very engaging to students. We think this tweak to the standard worksheet is a way to turn those boring questions into something more engaging.

In Ontario, grade 7s are introduced to operations with fractions. Addition & subtraction and multiplication & division with whole numbers. The premiss here is fairly simple. Students are presented with multiple cards of questions (in this case of adding and subtraction of fractions (with a little of division and multiplication with whole numbers). The cards represent problems that increase in difficulty as you go from one to the next. Students can all start at the first envelope or you could give them an exit card the day before to help place them in a particular card to start. Students check their own answers using answer cards with the answers written with "invisible" ink that can be revealed by shining a UV light on it.

Students really seem to like this style of activity as they feel empowered to move from card to card when they are ready and the added feature of checking the answers with the UV pen gives a sense of novelty. This could be used as practice or review.

  • Gr7 - divide whole numbers by simple fractions
  • Gr7 - use a variety of mental strategies to solve problems involving the addition and subtraction of fractions
  • Gr7 - add and subtract fractions with simple like and unlike denominators, using a variety of tools (e.g., fraction circles, Cuisenaire rods, drawings, calculators) and algorithms;
  • Gr7 -  demonstrate, using concrete materials, the relationship between the repeated addition of fractions and the multiplication of that fraction by a whole number
  • Gr8 - As review (we plan an extension so that this could be used for grade 8 with multiplying and dividing fractions)
  • Enough copies of each of the question cards for your class (there are four cards per page at each level) in different colour card stock for each level,  laminated (use colours that allow seeing the magic pen writing - you may want to test this). You will likely not need as many cards in the last few envelopes as students work at different paces. You will need as many as you have in your class if you decide to start everyone at the first level. Fewer if you let students start at different levels (see below)
  • 3 sets of the answer cards (use magic pen to write the answers anywhere along each equation, they could be sideways, upside-down, (the answers are on the last page of the Google Doc). The answer cards are the same as the question cards but you write the answers in invisible ink on them. To help distinguish the answer cards to the question cards you should put a stamp or sticker on the back. Write on the cards first then laminate them. If you write on the card after lamination then the ink tends to wear off. There is a separate answer card on the last page of the download. That is for you to carry around (or not) but not for showing students but more for your reference.
  • 3 "magic" pens can be purchased at Chapters/Indigo or we found these at a Scholastic's book fair. We have since purchased some on eBay or Amazon.

  1. Place the questions in piles (or in envelopes taped to the wall) in order of difficulty and set up three stations for the answer cards. Students will get a card and answer the first 5 questions. 
  2. You could have all students start at level 1 but for this activity to be most successful, students should start at the appropriate envelope. If they start in one that is too hard they will be frustrated and if they start in one that is too easy they will be bored. Use an exit card (the day before) to help you decide which envelope each student should start in. When given back the exit card write down the level they will start in. 
  3. To check their answers, they will go to a station and use the magic pens. Students may decide to do one question at a time and then go check their answer or they may do all 5 and then check. Students are monitoring themselves so they decide. If they get the first 5 right, they have a level of mastery to move themselves to the next card. If not there are more questions on the card until they master that type. You can decide whether you want them to do the other 5 or just do enough to get a total of five correct. 
  4. As they move through the continuum, the hope is that they reach level 6 which matches the grade 7 curriculum. Since our goal is to get them to level 6, students should solve ALL equations on that card instead of just five. 
  5. The seventh level is set up to challenge students who are moving forward quickly. They should solve all questions on this card.  


  • Fraction Operation Continuum (with Answers) - (PDF, Google Doc)
Did you use this activity? Do you have a way to make it better? If so tell us in the comment section. Thanks